I’m so excited to finally be able to share this DIY Strawberry Costume with you guys! I teamed up with 6 other bloggers and Shabby Apple to do a dress-turned-costume shoot! Shabby Apple has some of THE CUTEST dresses around- especially dresses with a vintage/retro vibe, which I love! It was so fun coming up with ideas for costumes using these pretty dresses. I finally decided on doing a DIY strawberry costume, and I love the way it turned out! All of the other bloggers were so creative as well!
I know I’m not a DIY blogger, but I did try to get some photos of how I made the costume. Sorry they aren’t the best DIY photos you’ve ever seen haha. I’ll work on that. But first, a sneak peek:
DIY Strawberry Costume

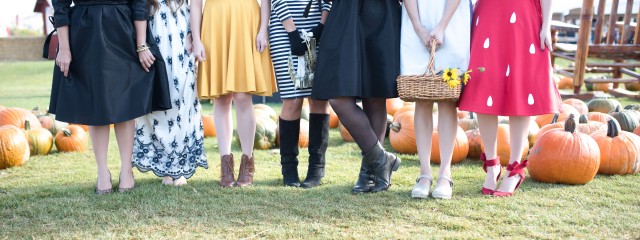
 Blogs from Left to Right: Me, Lauryncakes, Wild One Forever, Canary Jane, Just Another Insta Gal, Modest Goddess, Blakely. Go check out their costume posts as well!


Shop this DIY Strawberry Costume look!
Red Wrap Dress: c/o Shabby Apple || Red Bow Shoes: Amazon || White Petticoat: Amazon
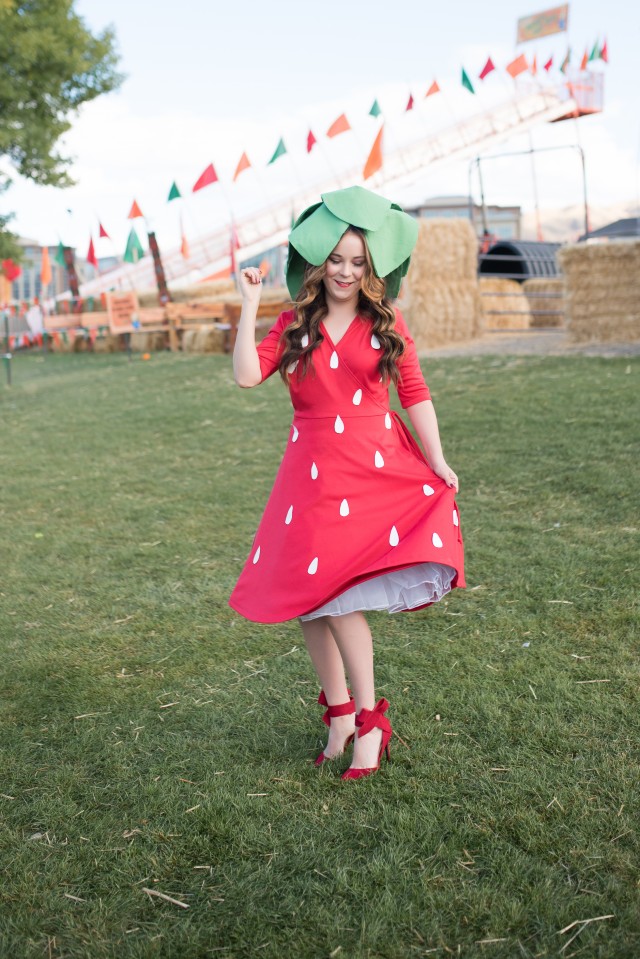
I chose this pretty Shabby Apple red wrap dress for my DIY strawberry costume. I wanted more volume under the dress so I could create a “strawberry shape”, so I added a petticoat underneath! It worked perfect. I made the green leaf hat (tutorial below), and used white cardboard for the seeds, which I stuck on to the dress using toupee tape. Here is the “tutorial” I made for the green hat:
DIY Strawberry Costume Tutorial:
Materials:
- Red Dress
- White Poster board (Or construction paper)
- Hot glue and gun
- Toupee & Clothing Tape (or double sided tape- I think toupee tape is stronger though)
- Heavy green fabric (like felt)
- ***Note: I couldn’t find a shade of heavy green felt that I liked. I wanted a bright green color, and could only find dark forrest green. So, to compensate, I bought green fleece (shown in the photos) and a heavy white structured fabric that is made to give material more shape. I used this white material as a middle layer between two green fleece layers, so that the leaves would have more shape and structure. If you can find a felt color that you like, I don’t think you would need to do this step, since felt is already pretty thick.
Step 1: Cut a strip from the white poster board. This will be used as a band to wrap around your head and attach the leaves to. Wrap the strip around your head where you’d like the headpiece to fit. Leave a little extra room, though. Once all the leaves are glued on, it will fit a lot tighter- so take that into account. Glue the ends of the poster board where you like them to create the base.

 Step 2: Make seven leaves:
Again, I used the white middle layer to give my leaves more structure. Skip this step if you find a thick enough material in a color you like.
I made the leaves on my hat pretty big- I mean, if your going to be a strawberry, BE A STRAWBERRY. Amiright? But, if thats not your thing- you can always make them smaller :) My leaves are about 9 inches high and 5 inches wide. I didn’t use a stencil for each leaf- I wanted them to vary a little (like a real strawberry would) so I just eyeballed it each time. My steps:
- Cut out 7 white leaves
- Cut out 14 green leaves
- Layer one white leaf inside two of the green leaves
- Hot glue each of the layers together (trim edges if necessary so it looks neat)
- Repeat until you have 7 leaves


 Step 3: Glue leaves to headband.
I put three leaves on the inside of the headband, and four leaves on the outside. Because the leaves are pretty wide, you will overlap them (about halfway) while gluing in order to fit them all on.


 The inside is finished! Because of the thick white layer in the middle, the leaves don’t just sag over, which I like! Now for the outside layer. Again, I used four leaves on the outside. I glued one at 12:00, one at 6:00, then glued leaves at 3:00 and 9:00 (see how I used a clock for position reference, eh? Eh??)


 Here’s the hat! You can bend the leaves how you like them. If you need to trim any, you can. Just remember to hot glue any loose pieces!
Step 4: Cut out the seeds! I didn’t count how many seeds I cut out… but it was a lot. Probably at least 40. Again, I didn’t use a stencil (ain’t nobody got time for that) and I just eyeballed each one. I cut them into teardrop shapes about 3″ long (At first I liked the seeds a little bigger, but once I put them on the dress I changed my mind. I went back and trimmed them all a little smaller, and also not quite as round on the bottom).

 Step 5: Once all the seeds are cut out, its time to put them on the dress! Position all the seeds on the dress before taping them on, so you can get them just where you like them. Once you like where they are all placed, start sticking a little piece of toupee tape on each one. I put seeds on the front and back of the dress.

 Step 6: FLAUNT YO’ STRAWBERRY STUFF!

Shop this DIY Strawberry Costume look!
Red Wrap Dress: c/o Shabby Apple || Red Bow Shoes: Amazon || White Petticoat: Amazon
Please Note: This post contains affiliate links, which means that if you click on one of the product links, I’ll receive a small commission from your purchase. This does not increase your paying price in any way! This only helps me to be able to afford taking time to keep making these blog posts! And please know, I only post products that I 100% love and would never post anything I didn’t believe was a great product. I appreciate your love and support in all of my blogging pursuits!
Thanks for your Love and for Subscribing!
Thank you to all of my wonderful followers who have subscribed to me in all of my different social media outlets! I had no idea when I started posting random “#ootd” selfies on Instagram that it would become this amazing adventure! I really feel so blessed! Thanks to getting me to where I am!
You can subscribe to my blog (above) and follow me on Bloglovin‘, Instagram, Facebook, Pinterest and Twitter! and pin, Pin, PIN away!
You guys are seriously the best! Thank you for supporting me in what I love to do!


7 Comments
Lauryn Hock
October 21, 2016 at 4:07 pmYou are the cutest! I love that you showed how you made your hat!
Keara
October 22, 2016 at 10:30 amThanks girl! Not the best tutorial, but it does the job!
Modest Halloween Costume Ideas: DIY Butterfly Filter Costume & Tutorial - Modest Goddess
October 22, 2016 at 12:53 am[…] Strawberry – Modest Style […]
Kristin Davis
October 22, 2016 at 1:05 amWAY TOO CUTE GIRL!
Keara
October 22, 2016 at 10:30 amThanks lady!
Scary Shabby Giveaway and an easy Robber Halloween Costume - Wild One Forever
October 22, 2016 at 1:07 am[…] Addams: @lauryncakes (Blog post HERE) Strawberry: @modest_style (Blog post and tutorial HERE) Fairy: @blakely.b Cat: @justanotherinstagal Belle: @canary_jane Butterfly Instagram Filter: […]
EASY ADULT BELLE COSTUME – Canary Jane
January 28, 2017 at 8:10 am[…] simple Halloween costumes you can check out the rest of our gang by clicking the links below. Strawberry: Keara from Modest Style Robber: Kristin from Wild One Forever Lauryn from LaurynCakes Cat: Violeta from Just Another […]